
Do you use WebP to serve the images on your websites? According to Google Developers, “WebP is a modern image format that provides superior lossless and lossy compression for images on the web”. WebP images can save over 25% of file size compared to JPG and PNG formats. So, you should make use of WebP to improve your website’s speed.
Unfortunately, JPG and PNG are still primarily used to store source images. So, you need to convert them to WebP while preparing for the web. Nobody is willing to do this manually per image while content updates. If your site is running on WordPress, you just need to install a simple plugin to handle the process. There are many free WebP plugins available on WordPress.org. If you post on Medium, you don’t need to worry about that. Medium only supports JPEG, PNG, and GIF images. However, sometimes this little work will become your trouble, when you build a JAMstack website, such as Jekyll and Hugo. You want a smart way to automate the WebP generation process in your workflow.
In this article, I will share a universal approach that is adaptable to different JAMstack frameworks for auto-generating WebP based on Git hooks. It is more flexible than relying on a plugin that sticks to a particular framework or language. The approach works locally on Windows, macOS, or Linux, so it is easier to debug and prevent the server-side errors. Also, it is an easy to adopt workflow, even for non-techies.
Why I do not choose a WebP plugin for Hugo/Jekyll
There are mainly two reasons why I go away from the plugins:
- Too difficult to implement
- Unavailable or blocked on the server-side
An example of the first case is Hugo. The official release still does not support image processing of WebP image resources, through many users request for this feature [1]. To workaround, you can add WebP features by building a custom Hugo binary from source [2]. But, I believe that is too complicated for most people.
The second case happens when hosting Jekyll on GitHub Pages. For a long time, I have used a plugin called jekyll-webp as the WebP generator for my Jekyll websites. It works well on my local machines. However, it is not whitelisted by GitHub Pages [3]. To bypass the restriction, I attempt to deploy my Jekyll sites using GitHub Actions. In this way, the plugin runs in the gh-pages build process, but still, no WebP is written to the output directory. In addition to this, the plugin significantly lengthens the Jekyll build time. Compared to Hugo, Jekyll is slow. The WebP plugin further impedes Jekyll’s performance.
Because of these two reasons, I want a more ideal way to instead. It should be user-friendly. It should be process fast and stable in a controllable environment. Since Git and GitHub are often used in managing JAMstack sites, it is a good idea to integrate a pipeline into the git workflow using Git hooks.
How to use Git Hooks to automatically create WebP
GitHub is popular. We store our source codes in the repositories on GitHub. We host websites on GitHub Pages or deploy apps to Netlify via GitHub. You may often use Git and GitHub too. But you may not know about Git hooks.
Git hooks are a built-in feature of Git for you to trigger custom scripts before or after events, such as commit, push, and receive. They are often utilized to run error checks, send notifications to team members, and generate documentation as file changes. I think now you get the idea about how Git hooks help to automate development workflows and enhance productivity.
Let’s see how to hook a trigger for the WebP generation. Before getting started, make sure that you installed Google’s cwebp encoder to your machine. You can download and install the WebP conversion tool with the following steps:
- Download the Precompiled WebP utilities and library from this Official page.
- Unzip the downloaded archive file.
- Add the
bindirectory to the PATH environment variable of your system.
Open the project folder of your JAMstack website. Assuming that you have already used Git for its version control, you should find your local repository contains the hooks subdirectory in the .git directory. If they do not display, please change your File Explorer settings to Show Hidden Files and Folders.
We will automate to run our script before every git commit with a pre–commit hook. Set up and test the hook with the following steps:
1. In the hooks directory, create a new file called pre-commit or edit the file if already exists.
2. Copy the following script into the file, and Save it.
3. Now add two or three JPG and PNG images to your local repository to test the pre-commit hook. You can place them to different folders and subfolders.
Example:
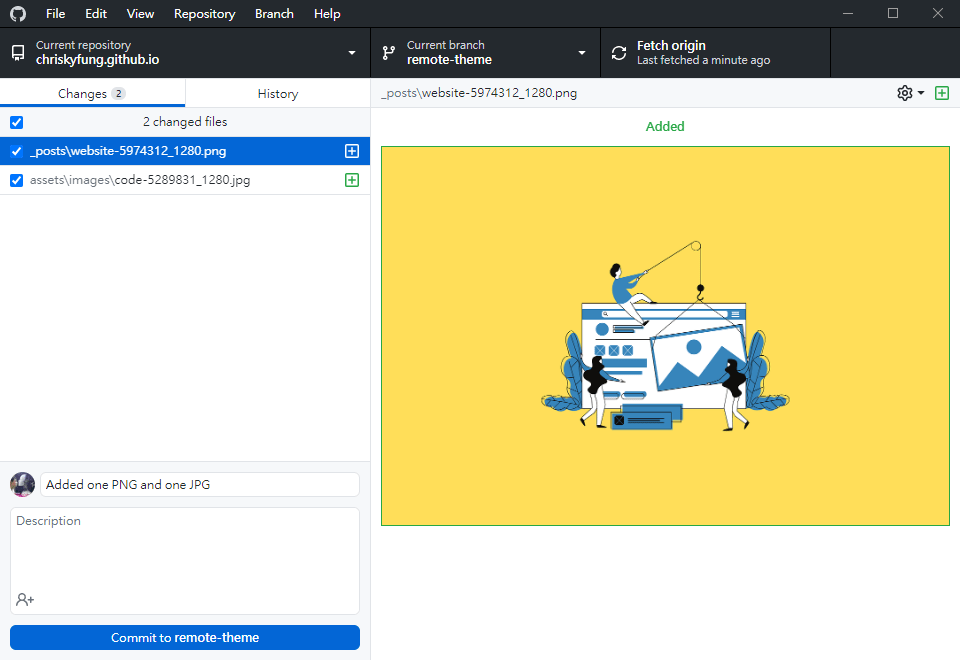
4. Make a commit to trigger the hook.
If you use GitHub Desktop, like the figure above, you need to enter a Summary before press the Commit button (For command line interfaces, you can run git commit with an empty message).
After a few seconds, you will obtain the WebP versions of the JPG and PNG images.
5. Click on Undo if you use GitHub Desktop.
Example result:
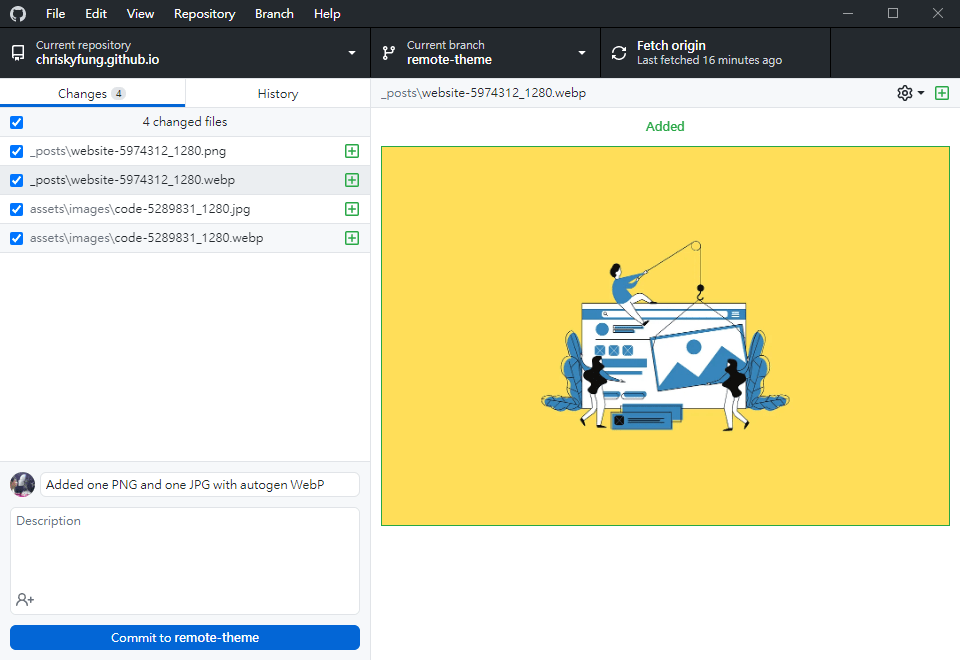
You should see a result like the above figure. Each source image now has its WebP version in the same folder.
In real practices, it is unnecessary to perform Step 5. You can make a new commit for the WebP images, and then push two commits to remote at once.
Summary
With using Git hooks, you no longer forget to generate WebP for any image changes before pushing updates to GitHub Pages or Netlify. You don’t need to worry about the issues induced by plugin dependencies and server-side configurations. It runs locally and works standalone from site generators. It allows you to create WebP images fast, stably and consistently for various JAMstack platforms.
References
[1] Add image processing support for WebP image resources · Issue #5924 · gohugoio/hugo | GitHub
[2] WebP Image Processing in Hugo | Khusika
[3] Dependency versions | GitHub Pages
This article is originally published in Medium.com on Feb 27, 2021.
If you enjoy this post, please share it on Facebook and Twitter. You might also support us by making a donation through Ko-fi.