
As your website grows, you need to implement a search feature for visitors to find your blog posts and page content quickly and easily. Static site generators (such as Jekyll and Hugo) just build a bunch of HTML, CSS, and JavaScript files for your website. No server-side search functionality will be available, when you publish those files on a static web hosting, like GitHub Pages, Netlify, Amazon S3, and Google Cloud Storage. Despite, there are several ways that you can make a static site searchable, including:
- Lunr.js: A client-side full-text search engine for a small site (free)
- Algolia: A search-as-a-service platform offering 10,000 free searches/month (freemium)
- Programmable Search Engine by Google: Formerly known as Custom Search Engine (free)
Among them, Google Custom Search Engine (CSE) is the easiest to implement. Its Standard Search Element provides unlimited free, ads supported search with simple javascript. Google handles everything from its end, so no overhead adds to your server that will slow the web performance. For conventional non-AMP websites, you just need to copy and paste the CSE code to your HTML webpage.
Modify Google CSE to Accelerated Mobile Pages (AMP) Compatible
We want our websites to be fast. AMP is the right technology to speed up your websites for instant page loading. Typically, the AMP framework restricts third-party JavaScript on the page. The use of the CSE code will violate the AMP validation.
One possible way is to wrap the CSE component with an <amp-iframe>. However, this approach will cause several display issues. For instance, the auto-suggestion will overflow the boundary of the iFrame when the users are typing in the search box. A similar problem occurs during rendering search engine results. When the SERP does not fit within the iFrame, it will display with scrollbars. The layout may look bad and not user-friendly. Thus, I don’t recommend this method.
Perhaps you may think about using the <amp-script> component as an alternative. Unfortunately, it won’t work because of the same-origin policy restriction. The CSE does not seem to have any options for setting a Cross-Origin Resource Sharing (CORS) configuration. You may build a dedicated proxy to attach a CORS header. However, the settings will be somewhat complicated for non-techies to implement. As a result, I came out with a simpler solution instead.
In this post, I will teach you how to work around by adding the Google CSE using a two-page layout approach to AMP sites. You will implement your own search box on one page and render the standard search results on another page by transferring the search query via the URL parameters.
1. Set up a page for rendering search results
If you have not created a search engine for your site yet, please click this link to create a new one from the CSE control panel.
Follow the procedures to implement a stand-alone search results page:
- In the CSE control panel, select a search engine for your website.
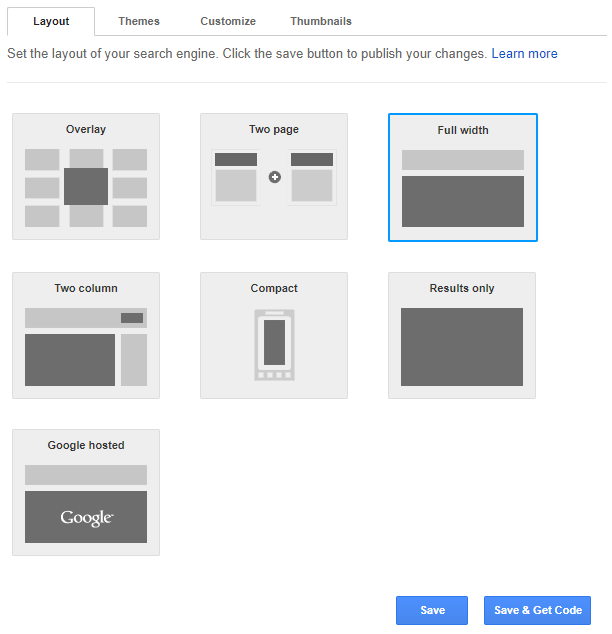
- Navigate to Look and feel in the left pane.
- Choose Full width on the Layout tab, or Results only if you want to display your SERP without a search box.
- Click on Save & get code, and then copy the code to your clipboard.
- Create a new page on your website, e.g.
/search. - Paste the code to into a
<div>element in your page’s<body>section.
<script async src="https://cse.google.com/cse.js?cx=YOUR_SEARCH_ENGINE_ID"></script>
<div class="gcse-search" enableAutoComplete="true"></div>
where YOUR_SEARCH_ENGINE_ID on line 1 is the Custom Search Engine ID, which looks like 000888210889775888983:y9tkcjel090. The enableAutoComplete attribute is the option for activating the CSE’s AutoComplete feature while users type in the search box.
When finished, Save and preview your page.
2. Test your Search Engine Results Page
Open your newly published search page in your browser, add ?q= with a search keyword to the end of the page URL in the address bar. In addition, you can restrict to search a specific site by appending &sitesearch=SITEURL to query parameter, for example:
https://your-domain.com/search?q=search-keyword&sitesearch=example.comNote the q=search-keyword param in the URL is where to let the CSE element know what query results to display.
3. Create an AMP search box for querying Google CSE

After setting up the SERP on your website, we can establish a mechanism for users to trigger the search on other site pages. It is generally a search box in the header, sidebar, or footer. To make those pages to be AMP valid, you need to implement a stand-alone search box with <amp-form>. You must include the following AMP script in your site’s <head> section:
<script async custom-element="amp-form" src="https://cdn.ampproject.org/v0/amp-form-0.1.js"></script>In the <body> section of your theme, use the following code to add a simple form for users to input search query:
<div class="search_form">
  <form method="GET" action="/search" target="_top">
    <input name="q" type="search" placeholder="Search" required />
    <button type="submit">Search</button>
  </form>
</div>
4. Implement AutoComplete
You may be expecting a search engine with auto-complete capability because users may enter all kinds of spelling mistakes. Auto-complete avoids all those mistakes from happening. It also enhances search experiences.
The above search form does not have auto-complete. To enable autosuggestion, you can nest the input field with an <amp-autocomplete> component. In your site’s <head> section, includes the following AMP script:
<script async custom-element="amp-autocomplete" src="https://cdn.ampproject.org/v0/amp-autocomplete-0.1.js"></script>Since the form is separated from your CSE service, you need to define the suggestion terms either inline or refer to a data source from your endpoint. The terms must be enumerated in a JSON object containing an array property items as the following structure:
{
  "items": [
    "apple",
    "orange",
    "banana"
  ]
}
I recommend you to save the data as a JSON file, e.g. suggestions.json. When you add the <amp-autocomplete> component to the form, use the src attribute to assign the path to the file. The finished code for the custom search box will become:
<div class="search_form">
  <form method="GET" action="/search" target="_top">
    <amp-autocomplete filter="substring" src="/PATH/suggestions.json">
      <input name="q" type="search" placeholder="Search" required />
    </amp-autocomplete>
    <button type="submit">Search</button>
  </form>
</div>
5. Manually sync amp-autocomplete with Google Custom Search autocomplete suggestions
By utilizing the import/export feature in the CSE control panel, you can exchange the suggestion items for both AMP’s and CSE’s autocomplete functionalities. The following guide illustrates how to process the data:
- Navigate to Search features > Autocomplete in your search engine settings.

- Scroll down and click on the link Upload/download XML near the bottom of the page.
- Download the autocomplete files from the CSE.

- Open the downloaded XML file with your text editor.
- Extract the suggestion terms using Regex, and convert them to the JSON format.
- Replace the JSON array object in your
<amp-autocomplete>data source file.
In a nutshell, you can add the Google Custom Search Engine (CSE) with an autocomplete feature to your AMP static website. The best way to ampify the search component is to add the CSE using the two-page layout approach. You need to build a custom search box with <amp-form> and <amp-autocomplete> for the AMP pages, and use it to trigger the page that installs with the CSE JavaScript for rendering search results.
Most pages on your website will keep AMP valid in this way. Only the search result pages will be a non-AMP single page. Your entire website will still have a superfast overall page-loading speed. With the suggested approach, you can implement a fast and searchable AMP-First static website with the Google CSE.
References
- Google Custom Search Engine | CloudCannon Academy
- Implementing search box in Custom Search – Google Developers
- Custom Search Control Panel – Google Developers
- <amp-autocomplete> – amp.dev Documentation
If you enjoy this post, please share it on Facebook and Twitter. You might also support us by making a donation through Ko-fi.