No matter which stage of development you are in, as projects progress and requirements change, it is often necessary to migrate existing WordPress websites to new environments or servers to adapt to different development, testing, or production needs. Therefore, backup and migration is a must-have skill for every WordPress developer or administrator.
Faced with the complexity and potential risks of migration, a reliable tool can make all of this effortless, achieving seamless and lossless migration. We recommend using the WordPress plugin “WPvivid Backup & Migration” because it provides a concise, efficient, and completely free solution.
This plugin not only helps you easily back up and migrate all files and databases of a WordPress website, but also provides various migration methods, making the migration process both secure and reliable, as well as flexible and elastic.
Next, we will demonstrate how to use this plugin to migrate a WordPress website to a new environment. You can refer to our “Building a WordPress Local Development Environment with Docker” tutorial to create a new WordPress as a playground for practising migration skills.
Through this tutorial, even if you are a beginner in WordPress, you can easily master migration skills with the help of this tool, adding a sense of ease and confidence to your WordPress development journey.
WPvivid Backup Manual: WordPress Site Migration Guide
Preparations: Install and Activate the Plugin
Before getting started, make sure to install and activate the WPvivid Backup & Migration plugin in the backend of both the migration source and the new environment’s WordPress.
Download the WPvivid Backup & Migration plugin now and start the adventure of migrating your WordPress website!
Step 1: Backup the Database and WordPress Files
Navigate to the Backup & Restore page of WPvivid Backup through the sidebar in the WordPress Admin dashboard.
Here, you can choose the backup method. One simple approach is to pack the database and WordPress files together into into your host’s storage space.
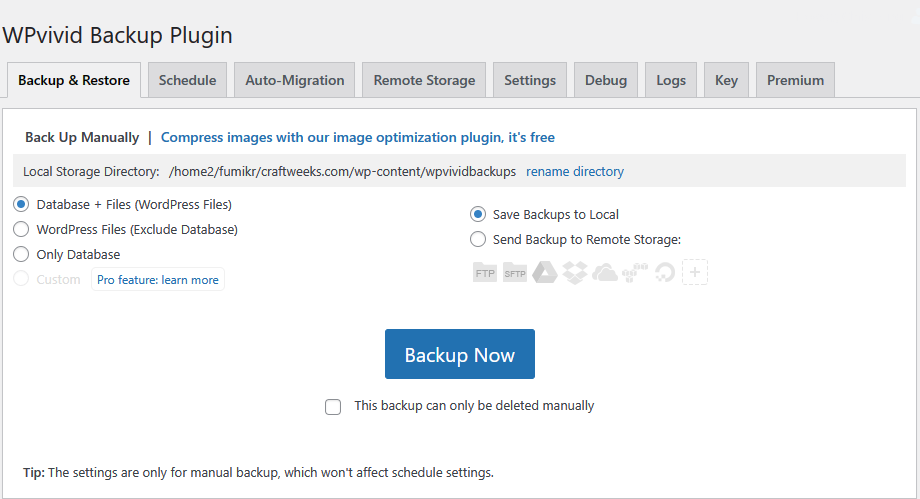
Click on Backup Now to perform a manual backup.
Note
In certain situations, such as insufficient storage space on the host, you can back up only the database with the plugin, while the WordPress files can be copied to your computer via the FTP function of your hosting service.
You can also consider configuring FTP or cloud storage on the Remote Storage page and setting an appropriate split size for the backup file on the Settings page to upload the backup to your specified remote space.
If it is a migration between online hosts, you can try using the Auto-Migration page to automatically copy and migrate after pairing the sites using keys.
Step 2: Download the Backup File to Your Computer
After the backup is complete, you can find the list of backup records at the bottom of the Backup & Restore page. Here, click Download to download the backup you need, storing the zip-compressed backup file(s) on your computer.

Step 3: Restore the Website from Backup on the New Site
Copy or move the downloaded zip-compressed backup file(s) to the wp-content/wpvividbackups location under the WordPress root directory of the new environment.
Alternatively, log into the new WordPress admin dashboard and push the backup file(s) to the new WordPress through the Upload form on the Backup & Restore page of WPvivid Backup.
Note: The second method is simpler but may be limited by the PHP environment configuration for file size uploads. Therefore, it is recommended that experienced developers use the first method.
Next, click the Scan button to detect the backup file(s) and then click Restore to start the restore process. At this point, the plugin will automatically replace the base URL of any hyperlinks in the database.

After completion, you should see the entire website successfully copied to the new environment.
Since the database has been overwritten by the backup, you will need to use the users and passwords of the original website to log back into the new WordPress backend.
Supplemental Notes
The WPvivid Backup & Migration plugin recommended in this article is not the only choice; there are many similar WordPress plugins available on WordPress.org.
Additionally, there are multiple methods of backup and migration, including using WP CLI, phpMyAdmin, and other tools to perform original import and export operations on SQL databases.
The migration process typically involves the following steps:
- Backup all files in the source WordPress root directory.
- Export SQL data tables from the source WordPress.
- Restore WordPress files and folder structure in the new WordPress root directory.
- Import SQL data tables into the new WordPress database, then scan and replace old website base URLs with new ones.
Choose the method that best suits your experience and level.
Here are some best practices and important tips for migrating WordPress websites:
- Disable plugins: Some plugins may affect migration, especially caching, redirects, or firewall plugins. It is recommended to disable these plugins before migration to ensure a smooth migration process.
- Check host space: Ensure that your new host has enough storage space to accommodate the entire website’s backup files. Insufficient space may lead to migration failure or data corruption.
- Test the new environment: After completing the migration, be sure to thoroughly test the WordPress website in the new environment to ensure that all pages and features are functioning properly. This includes checking links, form submissions, plugins, and more.
Conclusion
Using the WPvivid Backup & Migration plugin for backing up and migrating WordPress websites is a relatively simple and efficient process. By following the three-step migration outlined above, even beginners can successfully complete the task, ensuring a seamless transition of the website in different environments.
If you enjoy this post, please share it on Facebook and Twitter. You might also support us by making a donation through Ko-fi.