
Last modified:
🚀 Breaking News:
On September 11, 2024, Elementor dropped a bombshell by announcing the sunset of its static hosting services starting in 2025. This move has led to the removal of the official websites for Strattic and WP2Static, leaving users scrambling to find documentation through Web Archives—a great frustration!
With Elementor pulling the plug, the future of WP2Static is now shrouded in uncertainty. Will the community step up and fork this open-source project? Stay tuned for more updates! 🌟
For those seeking a straightforward option, Elementor Hosting starts at just USD $2.99/month—an easy and economical choice. Don’t forget to check out Elementor Coupons for exclusive discounts! 🌟
Note: This post includes affiliate links for which I may make a small commission at no extra cost to you when you make a purchase.
What is WP2Static?
WP2Static is a free and open-source WordPress plugin maintained by Strattic by Elementor. This powerful tool is specifically designed to generate a static site from WordPress, capturing a snapshot that includes all vital resources such as HTML, CSS, and images, while stripping away dynamic elements and backend intricacies. The result is a lightweight site that looks identical to the original. Here are some significant features of WP2Static:
- Variety of Deployment Options: WP2Static offers a range of deployment platforms, including Netlify, Amazon S3, and Google Cloud Storage, allowing you to choose the best solution tailored to your deployment needs.
- Automated Deployment: WP2Static makes the creation and deployment of static files a breeze with its automated system, enabling effortless site updates with a single click.
- Flexible Open Source: WP2Static is designed with numerous custom hooks, empowering developers to enhance the plugin’s capabilities and integrate it smoothly into user workflows, allowing for tailored adjustments and optimizations in the static site generation process.
These features give WP2Static powerful capabilities, flexibility, and applicability. Whether you’re aiming to launch a personal blog or a business website, you’ll discover an ideal deployment solution with ease. This makes WP2Static a top-tier choice and one of the leading WordPress static site generators.
Beyond these impressive features, transforming your WordPress website into a static site offers a multitude of advantages.
Why Should You Consider Making Your WordPress Site Static?
Static WordPress sites present a multitude of benefits compared to their dynamic counterparts. Here are some key reasons:
- Enhanced Security: Static sites do not involve dynamic content or database connections, which significantly reduces the risk of hacking or malware attacks.
- Higher Performance: With no server-side processing required, static sites load more quickly. This improvement can greatly enhance the user experience, especially for those accessing your site on mobile devices or in low-bandwidth environments.
- Lower Costs: Static websites can be hosted on budget-friendly or even free platforms like GitHub Pages, Netlify, and Google Cloud Storage. This approach not only cuts down on operational expenses but also makes managing your infrastructure much easier.
- Easier Upkeep: Static websites require very few updates and maintenance due to the absence of dynamic content. This significantly reduces the management workload, allowing you to focus more on content creation.
Transforming your WordPress into a static site can dramatically reduce the risk of security vulnerabilities, enhance your site’s loading speed, and improve the overall user experience. These benefits are applicable across a range of scenarios, from personal blogs to company websites, and even the internal sites of large organizations.
Now that we have grasped the basic concepts and key features of WP2Static, along with the benefits of making your site static, let’s look at the steps to install and configure the WP2Static plugin.

Preparing WP2Static from Source Code
WP2Static isn’t available for download from WordPress.org. Previously, you had to sign up on its official site, wp2static.com, to get the download link. But with Elementor announcing the sunset of its static hosting solution, the WP2Static website has vanished into the digital ether, leaving many users puzzled. Fortunately, all is not lost! You can still find the source code on WP2Static’s GitHub repository. With a bit of PHP Composer magic, you can whip up your own ZIP installation file in no time.
PHP Composer is a dependency management tool for PHP, used to manage the libraries required for a project. It can automatically download and install these dependencies, making it an indispensable tool for modern PHP development. If your WordPress development environment has Composer installed, you can directly use it to download and install the core components of WP2Static.
However, WP2Static also comes with several add-ons. Since not every add-on can be directly downloaded and installed via Composer, this article will focus on how to compile the plugin’s ZIP installation file from the source code. If you want to delve into the technical details, it is recommended to refer to the official documentation “Compiling from source code” and explore the related repositories maintained by Elementor on GitHub.
If you’re part of the WordPress community, you’ve probably heard of Elementor—the masterminds behind the popular Elementor Website Builder. Loved by designers for its intuitive interface and robust features, it has become a go-to tool for creating stunning websites. But Elementor isn’t content to stop there. Over the years, it has thoughtfully expanded its reach across the WordPress ecosystem, offering a wide array of innovative products and services. From cutting-edge design tools to versatile WordPress hosting plans and advanced WooCommerce hosting solutions, Elementor continues to shape the way we build and manage websites.


Pair your static WordPress site with Elementor‘s Hosting for unmatched speed and security
Their Static Hosting service also incorporates this plugin, so security shouldn’t be a major concern. Still, we think it’s a smart move to set up a Composer container using Docker to compile the WP2Static source code into a ZIP installation file in a safe, isolated environment. Here are the precise steps to follow:
Step 1: Launch a Composer Container
First, you need to download the latest version of the official Composer image from Docker Hub. Open your command line and execute the following command:
docker pull composerOnce the image has been downloaded, create and start a Composer container using the following command:
docker run --name composer -it --rm composer bashIf you’re not very familiar with the Docker CLI, expand the box below to see a detailed explanation of the code.
Step 2: Clone the Source Code from the WP2Static GitHub Repository
After successfully accessing the container terminal, execute the following git command to download the WP2Static source code from GitHub:
git clone https://github.com/wp2static/wp2static.gitStep 3: Install Dependencies
Navigate to the project directory you just downloaded, and then execute the composer install command to install the required dependencies:
cd wp2static
composer install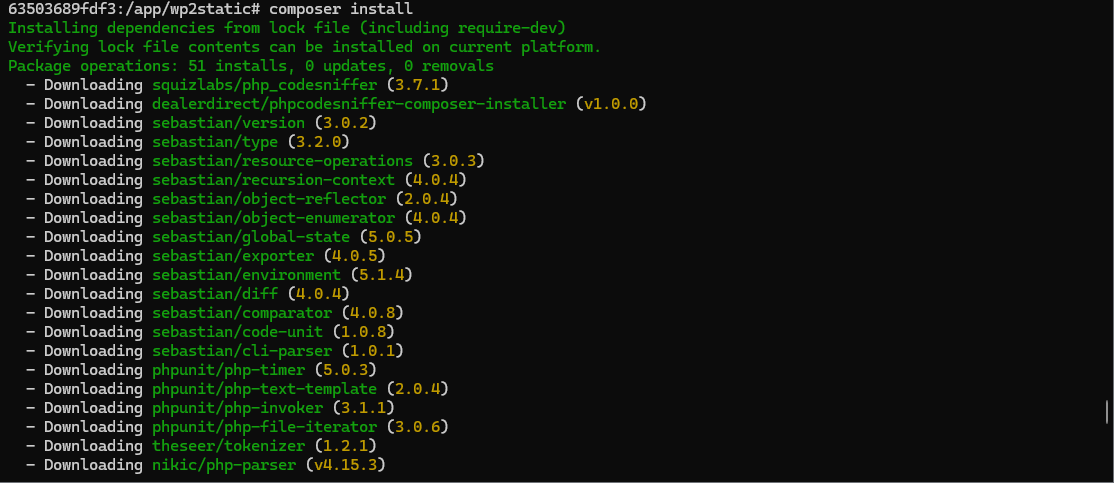

Step 5: Build a ZIP Installation File for the WordPress Plugin
Next, use the Composer command to compile WP2Static:
composer build <ZIP_NAME>Please replace <ZIP_NAME> with an appropriate file name, such as starting with the prefix wp2static-.
Example:
composer build wp2static-7.2Once completed successfully, you can list the generated ZIP files with the following command:
ls /root/Downloads
ls command to display the generated plugin installation filesPlease keep this command line open until the files are successfully exported from the container.
Step 5: Save the File to your Host
Open a new command line window and use the docker cp command to copy all files from a specific directory within the container to your host:
docker cp <Container ID>:<Path on Container> <Path on Host>Example:
docker cp composer:/root/Downloads ./wp2static-7.2This command instructs Docker to copy all files from the /root/Downloads directory within the specified Composer container to the wp2static-7.2 folder in your current host directory.
Compiling Add-ons for WP2Static
The WP2Static plugin above solely provides the core functionality for converting WordPress into a static snapshot. To meet diverse deployment needs and ensure platform compatibility, WP2Static introduces an ecosystem of add-ons, including wp2static-addon-netlify, wp2static-addon-sftp, and wp2static-addon-zip. Please compile the necessary add-ons by following the steps provided above, based on your deployment requirements.
Once the installation files are generated, proceed to install and configure them on your WordPress site.
Installation and Setup of WP2Static
Installing and Activating the WP2Static Plugin
First, log into your WordPress dashboard. Then, navigate to the “Plugins > Add New” page and click “Upload Plugin” to upload the WP2Static ZIP file.
After successful installation, return to the “Plugins” page in the dashboard and activate the newly installed WP2Static plugin.
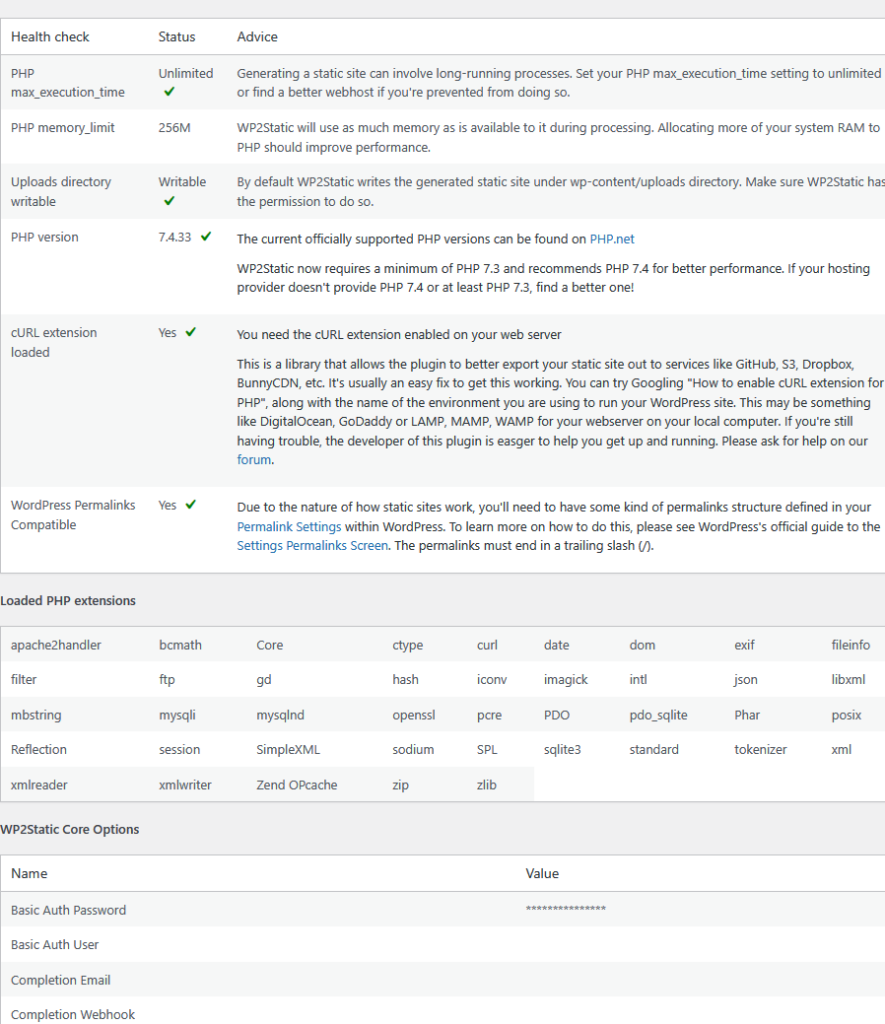
Upon first activation, it is recommended to check its health status. Navigate to the “WP2Static > Diagnostics” page to ensure your WordPress site has passed all health checks.
Configuring Add-ons for WP2Static
Next, we will walk you through configuring WP2Static and its associated plugins for deployment on Netlify.
Step 1: Install and Activate the Netlify Add-on for WP2Static
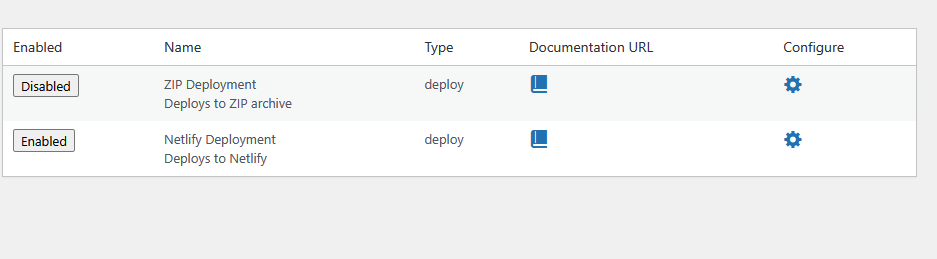
- First, follow the previous steps to install and activate the wp2static-addon-netlify plugin.
- Then, go to the “WP2Static > Addons” page and enable the Netlify Deployment option within the WP2Static settings.
Step 2: Create a New Project on Netlify
If you don’t have a Netlify account yet, sign up for a free plan on their official website. Once logged in, navigate to the Sites page in your Netlify dashboard and use the “Add new site” menu to create your project.
Each project will have a unique Site ID, which is a unique identifier assigned by Netlify. You can find this ID under “Site settings > Site details > Site information.”
Next, navigate to the “User settings > Applications” page and generate a Personal Access Token. This token will authorize your WordPress site to access the Netlify API.
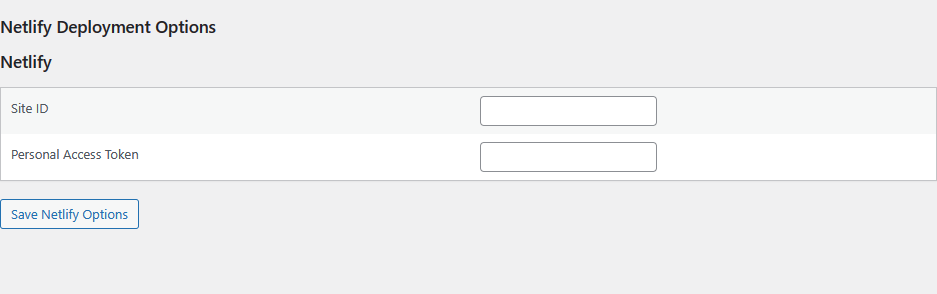
Step 3: Enter the Site ID and Personal Access Token in the Netlify Deployment Options
Return to the “WP2Static > Addons” page, click on the gear icon (⚙) in the Netlify Deployment item field, and enter the settings page. Fill in the Site ID and Personal Access Token obtained from the Netlify control panel in the respective fields, then save to confirm.
Step 4: Configure URL Rewriting
After deploying the website, the domain of the static site will typically differ from the WordPress host’s domain. For example, the host might use localhost:8080 as the root URL, while the static site could use a subdomain provided by the platform or a custom domain.
For example, Netlify will provide a URL in the format [name-of-your-site].netlify.app for your project. You can also go to “Site settings › Domain management” to assign a custom domain to use your private domain name.
Therefore, it is essential to perform URL rewriting during the static site generation process to correct internal links with the right URLs. The specific setup steps are as follows:
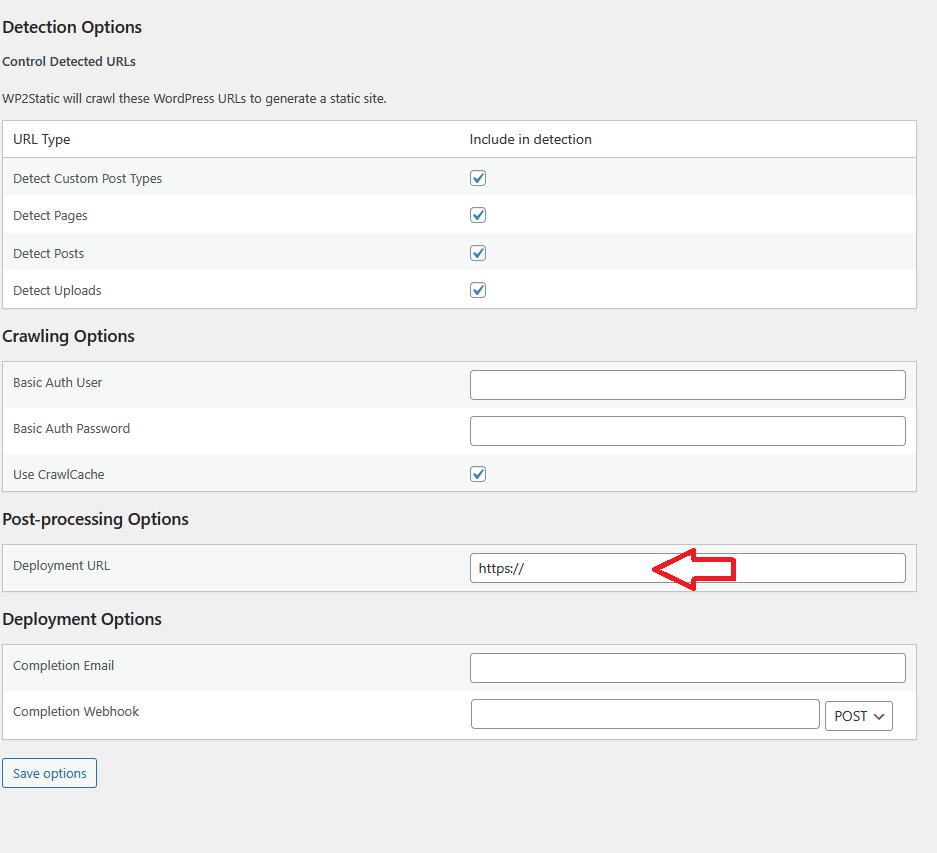
- In the WordPress dashboard, navigate to the “WP2Static > Options” page.
- Scroll down to the Post-processing options and fill in the Deployment URL input box with the domain used for deploying the static site.
After completing the plugin setup, you are now ready to generate and deploy your static website.
Executing the Generation and Deployment of a Static Website
Navigate to the WP2Static “Run” page and click the “generate static site” button to start generating the static website. Depending on the size of the website, this process may take anywhere from a few minutes to half an hour.
You can click “Refresh logs” at any time to check on the progress. Once the task is complete, you should see a series of log entries showing detailed information about the process, as shown in the following example:
2024-08-12 23:16:42	Starting post-deployment actions
2024-08-12 23:16:42	Netlify deploy complete. 471 deployed, 7850 unchanged.
2024-08-12 23:13:58	Starting Netlify deployment.
2024-08-12 23:13:58	Starting deployment
2024-08-12 23:13:58	Post-processing completed
2024-08-12 23:13:58	Finished processing crawled site.
2024-08-12 23:13:33	Processing crawled site.
2024-08-12 23:13:33	Starting post-processing
2024-08-12 23:13:33	Crawling completed
          ⁞
2024-08-12 23:10:46	Starting to detect WordPress site URLs.
2024-08-12 23:10:46	Starting URL detection
2024-08-12 23:10:46	Running WP2Static in Headless mode
2024-08-12 23:10:46	Running full workflow from UI
Once the generation process wraps up, WP2Static will seamlessly deploy your static files to Netlify for publication. Just pop the URL of your static website into your browser, and voilà—your site is live!
Next, ensure everything is running smoothly by checking for any anomalies or errors. If you spot any issues, make the necessary corrections and regenerate to update your site.
Even after a successful deployment, you might run into some common issues. Here are some FAQs to help you better understand WP2Static, troubleshoot and keep your site in top shape.
Frequently Asked Questions
We hope this information is helpful to you! 😊 If you would like to learn more, we recommend visiting the support page on the WP2Static official website.
Finally, let us summarize the entire process of using WP2Static and its advantages.
Summary
This article delves into how to use WP2Static, the open-source tool to transform your WordPress into a static website. WP2Static not only supports a variety of deployment platforms and automates the generation and deployment of static files, but it also offers extensibility to cater to diverse website needs. By leveraging WP2Static, site managers can significantly boost their site’s security and performance while slashing operational costs and maintenance headaches.
This article walks you through the steps for installing and configuring WP2Static, including how to compile the plugin’s ZIP installation file from the source code and configure add-ons like the Netlify add-on. Finally, we also explore some limitations of static WordPress sites and their solutions.
In conclusion, despite the end of support from Elementor, WP2Static remains a powerful and flexible tool that efficiently converts WordPress sites into secure, easy-to-maintain static websites, ensuring your site runs smoother than ever.
Resources
- What is Static WordPress? | Strattic — fast and secure static WordPress hosting
- Static WordPress: An Introductory Tutorial [2022] | seowings.org
- What are Static Websites: How, When, and Why to Have One? | seowings.org
If you enjoy this post, please share it on Facebook and Twitter. You might also support us by making a donation through Ko-fi.